1. 滑动验证码
说到滑动验证码,一定一定要提某验,虽然说市面上关于滑动验证码的产品有很多,但是某验的地位就像 10 年前脑白金在保健品市场的地位一样,业界标杆啊。
它越牛逼,市场上用它做防护的网站也越多,像国家企业信用信息公示系统、B 站、京东等等。
像某验的解决方案也有很多,不过原理大同小异。
1.1 简单滑动验证码
目标网址:https://member.zjtcn.com/common/login.html

一般来说我们与页面的交互可以使用 Webelement 的方法来进行点击等操作。
但是,有时候我们需要一些更复杂的动作,类似于拖动,双击,长按等等。
这时候就需要用到我们的 Action Chains(动作链)了。使用 selenium 去实现。
from selenium import webdriver

url='https://member.zjtcn.com/common/login.html'

browser=webdriver.Chrome()
browser.get(url)

slider=browser.find_element_by_css_selector('.ui-slider-btn')

// 使用动作链
action=webdriver.ActionChains(browser)
action.click_and_hold(slider).perform()  //perform()是按住不放的意思
action.move_by_offset(300,0)
action.release().perform()
2. 极验验证

以上图片是最典型的要属于极验滑动认证了,极验官网:http://www.geetest.com/。
现在极验验证码已经更新到了 3.0 版本,截至 2017 年 7 月全球已有十六万家企业正在使用极验,每天服务响应超过四亿次,广泛应用于直播视频、金融服务、电子商务、游戏娱乐、政府企业等各大类型网站
对于这类验证,如果我们直接模拟表单请求,繁琐的认证参数与认证流程会让你蛋碎一地,我们可以用 selenium 驱动浏览器来解决这个问题,大致分为以下几个步骤
1、输入用户名,密码
2、点击按钮验证,弹出没有缺口的图
3、获得没有缺口的图片
4、点击滑动按钮,弹出有缺口的图
5、获得有缺口的图片
6、对比两张图片,找出缺口,即滑动的位移
7、按照人的行为行为习惯,把总位移切成一段段小的位移
8、按照位移移动
9、完成登录
步骤大致是将缺口图和原图进行对比获取缺口的横坐标,并使用计算完成拖动轨迹模拟,之后使用 selenium 按照轨迹滑动完成缺口的拼接。
这一类方法的优点是门槛低,原理简单,缺点是完成滑动耗时较长,成功率无法估计(同一轨迹计算规则使用多次后成功率迅速下降)
2.1 滑动验证
目标网址:http://www.cnbaowen.net/api/geetest
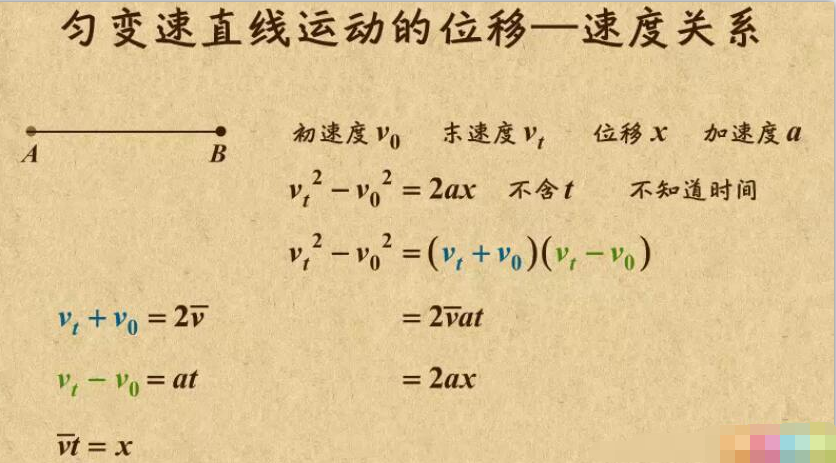
位移移动相当于匀变速直线运动,类似于小汽车从起点开始运行到终点的过程(首先为匀加速,然后再匀减速)。
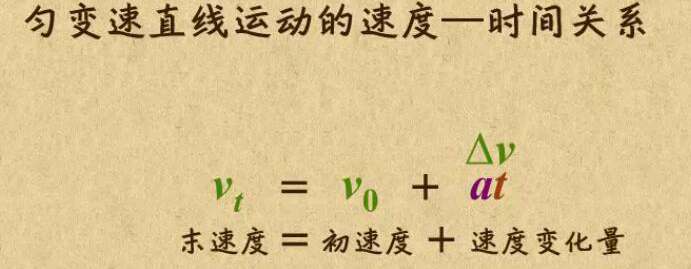
其中 a 为加速度,且为恒量(即单位时间内的加速度是不变的),t 为时间

2.1.1 获取图片
def get_image(driver, div_path):
    '''
    下载无序的图片  然后进行拼接 获得完整的图片
    :param driver:
    :param div_path:
    :return:
    '''
    time.sleep(2)
    # 获取图片地址
    background_images = driver.find_elements_by_xpath(div_path)
    # 图片位置信息
    location_list = []
    # 获取图片碎片
    for background_image in background_images:
        # 当前碎片位置
        location = {}
        # 匹配当前图片碎片的地址,位置
        result = re.findall('background-image: url\("(.*?)"\); background-position: (.*?)px (.*?)px;',background_image.get_attribute('style'))
        # print(result)
        location['x'] = int(result[0][1])
        location['y'] = int(result[0][2])

        image_url = result[0][0]
        # 将当前碎片信息添加到图片位置信息列表
        location_list.append(location)

        print('==================================')
        # 获取图片
        image_url = image_url.replace('webp', 'jpg')
        # ' 替换 url http://static.geetest.com/pictures/gt/579066de6/579066de6.webp'
        image_result = requests.get(image_url).content
        # with open('1.jpg','wb') as f:
        #     f.write(image_result)
        # 是一张无序的图片
        image_file = BytesIO(image_result)    // 将 image_result 以二进制的形式写进内存
        # image = merge_image(image_file, location_list)
        return image_file, location_list
2.1.2 对图片进行处理
def merge_image(image_file, location_list):
    """
     拼接图片
    :param image_file:
    :param location_list:
    :return:
    """
    im = Image.open(image_file)
    im.save('code.jpg')
    new_im = Image.new('RGB', (260, 116))
    # 把无序的图片 切成 52 张小图片
    im_list_upper = []
    im_list_down = []
    # print(location_list)
    for location in location_list:
        # print(location['y'])
        if location['y'] == -58:  # 上半边
            im_list_upper.append(im.crop((abs(location['x']), 58, abs(location['x']) + 10, 116)))
        if location['y'] == 0:  # 下半边
            im_list_down.append(im.crop((abs(location['x']), 0, abs(location['x']) + 10, 58)))

    x_offset = 0
    for im in im_list_upper:
        new_im.paste(im, (x_offset, 0))  # 把小图片放到 新的空白图片上
        x_offset += im.size[0]

    x_offset = 0
    for im in im_list_down:
        new_im.paste(im, (x_offset, 58))
        x_offset += im.size[0]
    new_im.show()
    return new_im
2.1.3 计算移动距离
def get_distance(image1, image2):
    """
    拿到滑动验证码需要移动的距离
    :param image1: 没有缺口的图片对象
    :param image2: 带缺口的图片对象
    :return: 需要移动的距离
    """
    # print('size', image1.size)

    threshold = 50
    for i in range(0, image1.size[0]):  # 260
        for j in range(0, image1.size[1]):  # 160
            pixel1 = image1.getpixel((i, j))
            pixel2 = image2.getpixel((i, j))
            res_R = abs(pixel1[0] - pixel2[0])  # 计算 RGB 差
            res_G = abs(pixel1[1] - pixel2[1])  # 计算 RGB 差
            res_B = abs(pixel1[2] - pixel2[2])  # 计算 RGB 差
            if res_R > threshold and res_G > threshold and res_B > threshold:
                return i  # 需要移动的距离
2.1.4 获取移动轨迹
def get_track(distance):
    '''
    拿到移动轨迹,模仿人的滑动行为,先匀加速后匀减速
    匀变速运动基本公式:
    ① v=v0+at
    ② s=v0t+(1/2)at²
    ③ v²-v0²=2as

    :param distance: 需要移动的距离
    :return: 存放每 0.2 秒移动的距离
    '''
    # 初速度
    v = 0
    # 单位时间为 0.2s 来统计轨迹,轨迹即 0.2 内的位移
    t = 0.2
    # 位移 / 轨迹列表,列表内的一个元素代表 0.2s 的位移
    tracks = []
    # 当前的位移
    current = 0
    # 到达 mid 值开始减速
    mid = distance * 7 / 8

    distance += 10  # 先滑过一点,最后再反着滑动回来
    # a = random.randint(1,3)
    while current < distance:
        # 设置速度
        if current < mid:
            # 加速度越小,单位时间的位移越小, 模拟的轨迹就越多越详细
            a = random.randint(2, 4)  # 加速运动
        else:
            a = -random.randint(3, 5)  # 减速运动

        # 初速度
        v0 = v
        # 0.2 秒时间内的位移
        s = v0 * t + 0.5 * a * (t ** 2)
        # 当前的位置
        current += s
        # 添加到轨迹列表
        tracks.append(round(s))

        # 速度已经达到 v, 该速度作为下次的初速度
        v = v0 + a * t

    while (total - distance - 10) > 0:
        # 反着滑动到大概准确位置
        tracks.append(-random.randint(2, 3))
        total = sum(tracks)
    return tracks
3. 浏览器使用用户数据
加载 Chrome 用户默认数据绕过登录
用户每次打开浏览器做相应操作时,对应的缓存和 cookie 会保存到浏览器默认的路径下,我们先查看个人资料路径,以 chrome 为例,我们在地址栏输入 chrome://version/

图中的个人资料路径就是我们需要的,我们去掉后面的 \Default,然后在路径前加上「–user-data-dir=」就拼接出我们要的路径了。
from selenium import webdriver

option = webdriver.ChromeOptions()
option.add_argument(r'--user-data-dir=C:\Users\xxp\AppData\Local\Google\Chrome\User Data')  # 设置成用户自己的数据目录

driver = webdriver.Chrome(chrome_options=option)

driver.get('https://www.baidu.com')
我们启动浏览器的时候采用带选项时的启动,这种方式启动浏览器需要注意,运行代码前需要关闭所有的正在运行 chrome 程序,不然会报错。
执行代码运行程序,selenium 自动化启动浏览器后我们会发现我之前保存的书签完整在浏览器上方,个人数据全部都在。
参考:
https://github.com/duziea/Python-imitate-login
https://blog.csdn.net/qq_34192032/article/details/101059706
欢迎各位看官及技术大佬前来交流指导呀,可以邮件至 jqiange@yeah.net